Videos Contact Projects Subscribe Home


Friday, December 30, 2011

Hot Cocoa Slider Card- Sassy Starter Project

I'm  the designer today at the "She's a Sassy Lady" blog. Click the link to visit Sheila's awesome blog!
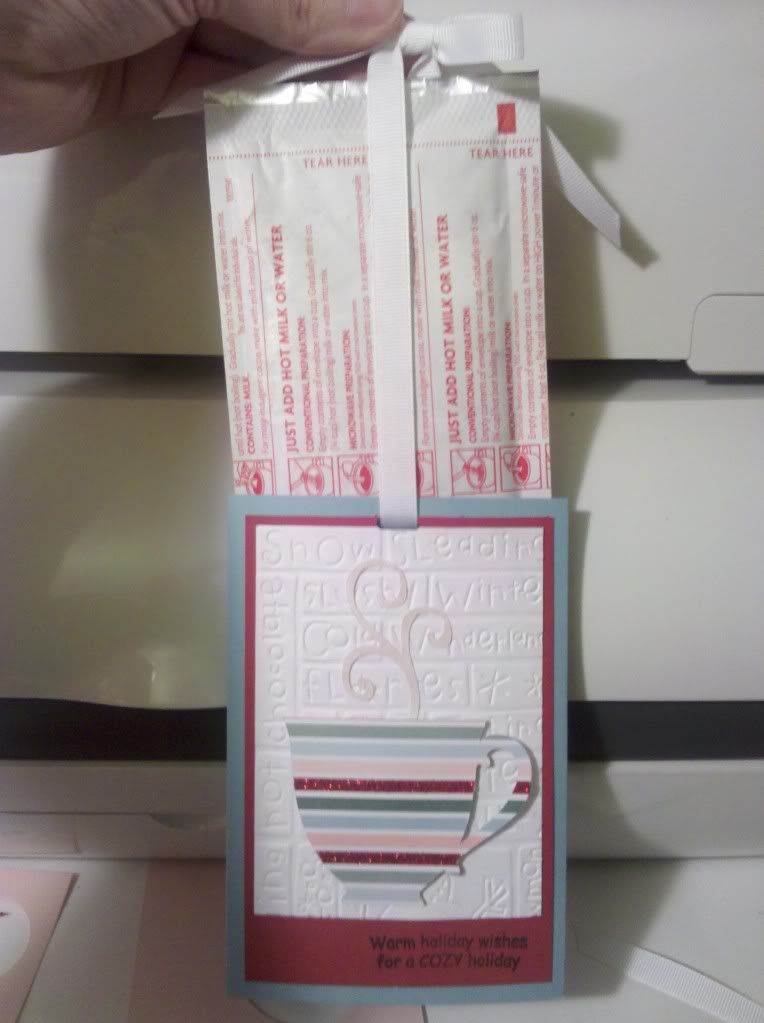
Today's project is quick and fun!  It's a card with a treat.  The idea is so "lifted." I got my inspiration from MPS's video


Uploaded from the Photobucket Android App

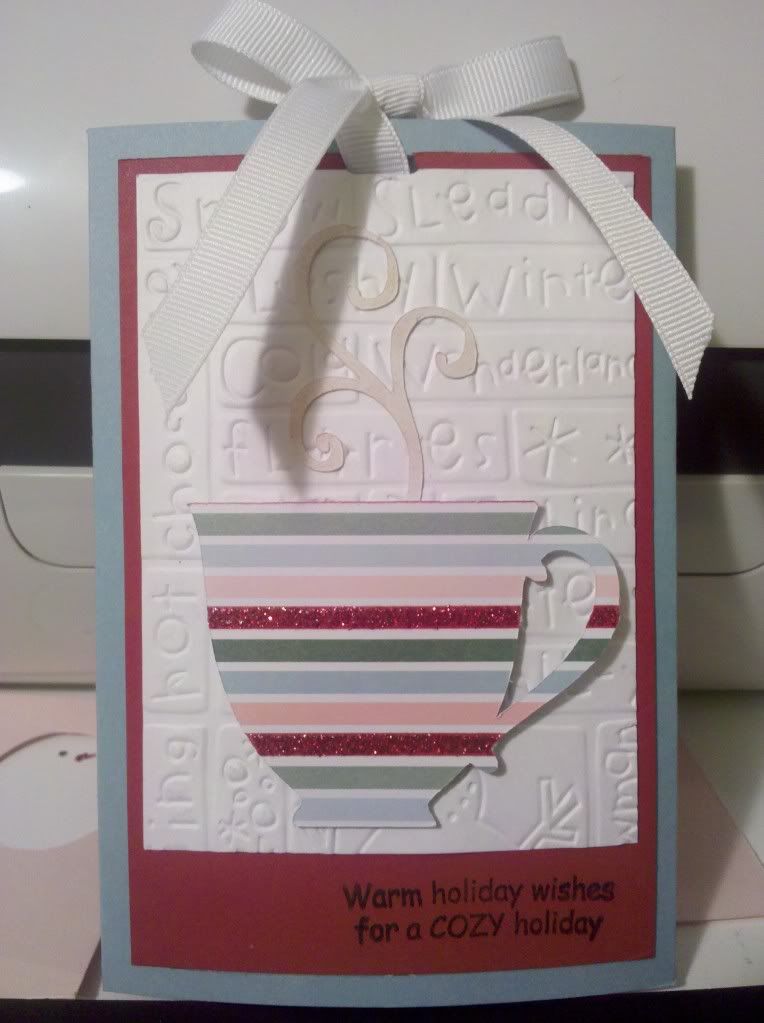
It measures 3 3/4 x 5 1/2 - base is SU Baja Breeze.
The red layer measures 3 1/4 x 5 1/8 - SU Real Red.
The white layer measures 3 x 4 1/4 and was embossed using a        Cuttlebug folder(sorry, don't remember the name.)
The sentiment is from Pink by Design's "Christmas Wishes" set.
I used white ribbon from Michaels for slider bow.

Uploaded from the Photobucket Android App


The cup and steam is from Cricut Joy of the Seasons.  I used SU designer paper cut at 2 inches.  The steam is white, but inked w/SU ink.  Click on MPS video link above and watch the video on YouTube to see a step by step on how to make your own slider card!  Until next time...

Thursday, December 22, 2011

Christmas Gift Card Holders

Uploaded from the Photobucket Android App


I made these gift card holders using My Creative Time's Gift Card holder die.  The Santa and Reindeer are from Cricut Doodlecharms cartridge and the Stocking is from Cricut Joy of the Seasons cartridge.
Each is cut at 3 inches.  Papers, Ribbon, Cardstock and Ink are Stampin' Up!(except the designer paper under the stocking and Reindeer.)  The sentiment is My Creative Time's coordinating Gift Card Sentiments.

Uploaded from the Photobucket Android App


Uploaded from the Photobucket Android App


Uploaded from the Photobucket Android App


Since I have older children and teenagers, gift cards are the way to go for several of my gifts.  I like that I can jazz up my gift with a cute, handmade holder!  Until next time...

Wednesday, December 21, 2011

Exploring Cricut Daily Design 5

Uploaded from the Photobucket Android App


Ok. To understand my little Santa, you have to know that my sister is a clerk at the Court House and works for three judges.  She asked me to make her some Christmas cards for her judges using Santa and judges robe.  This little guy is what I came up with.
The card measures 6 x 6 inches.  I used Stampin Up Chocolate Chip for the base,  Whisper White for the inside of card, beard, and hat.  For the first card layer, I used SU Cherry Cobbler.  The hat and undershirt is SU Real Red.  The embossed layer is SU Old Olive and was embossed with a Sizzix folder (don't remember the name.)
The ribbon is SU Soft Suede.  The stamped sentiments are all SU, inked with SU Basic Black.  I used PPDU for my little guy cut at 4.25 inches.  The robe is actually from Everyday Paper Dolls and is the graduation cut.
The Santa hat and boots are from PDDU.

Uploaded from the Photobucket Android App


Well, that's my project.  Hope you like it.  Now don't forget to go to Exploring Cricut to enter your project for this week's Challenge!  Until next time...

Monday, December 19, 2011

Exploring Cricut Pine Trees Challenge

Uploaded from the Photobucket Android App


For my project, I decided to make a scrapbook page.  I chose the Christmas tree tag from Cricut Very Merry Tags.  I started with a 12 x 12 piece of Stampin' Up! Always Artichoke for my base, Winter Wonderland cut at 11 1/2 x 11 1/2.


Uploaded from the Photobucket Android App


I used my Gypsy to manipulate my tree layers.  I used the "hide" function to delete the hole in the top of both layers of the tag.


Uploaded from the Photobucket Android App


I added my tree to my page with Stampin' dimensionals to raise it off the page a bit.


Uploaded from the Photobucket Android App


I used Cricut Winter Frolic for the sentiment and cut it at 3.25 inches out of Stampin' Up! Chocolate Chip, Always Artichoke, and Handsome Hunter.  The picture frame is from Cricut Art Philosophy.  I used my Gypsy to manipulate the dimensions to 4.25 x 5.6 inches.  I used Chocolate Chip and Always Artichoke.(the inner oval is cut away to add a photo.)


Uploaded from the Photobucket Android App


Easy, peasy!  Now go to Exploring Cricut to add your project entry!  Until next time...

Wednesday, November 23, 2011

Exploring Cricut Daily Design 4

Photobucket
For my project this week, I wanted to try out my "My Creative Time" gift card die.  I plan on giving my two oldest girls cards to their favorite nail shop, so I made these card holders for them.  I used my Cricut Forever Young cartridge and my Gypsy to cut out the nail polish bottles.  They are cut at 2" and popped up with Stampin' dimensionals.  I omitted the inside cut of the flower since it was so small and added a little bling.  My cardstock colors are Stampin' Up! Baja Breeze, Cherry Cobbler, Real Red, Garden Green and Basic Black.  The ribbon is Pink Pirouette.  The designer paper is also SU, but I've forgotten the name...is from last year.  I added a brad from Michaels and some more bling.  The sentiment is also from "My Creative Time" and is designed to coordinate with the gift card die.  The name is Gift Card Sentiments.
Well, that's my quick little Christmas project.  I hope you like it.  Feel free to comment or contact me with questions.  Until next time...

Monday, November 21, 2011

Challenge Project 4 - Exploring Cricut

Photobucket

This week's challenge over at Exploring Cricut Challenge Blog was to use a turkey image from any Cricut cartridge.  Well my first instinct was to choose a really cute turkey from either Smiley Cards or Create a Critter, but in the end, I decided to use the turkey from the Cricut Wildlife Cartridge.
Photobucket

I positioned the images on my Gypsy.
Photobucket

I hit my paper stash and found two pieces of CM papers from years ago.  Here they are placed on the mat, ready to cut on my E2.
Photobucket

A piece of 5.5" x 8.5" piece of SU Old Olive cardstock folded in half makes the card base.  A piece of 4" x 5.25" piece of SU Dusty Durango cardstock makes the  
layer.  The border trimmed with SU elegant punch.  And a piece of SU Soft Suede ribbon.
Photobucket

A piece of SU Kraft cardstock cut at 2" x 2 3/4", corners punched with SU elegant corner punch then embossed with Sizzix embossing folder and inked with SU Old Olive ink.  Popped the turkey on with SU dimensionals, and added a few buttons for accent.  A quick sentiment from Pink By Design's "Bountiful Blessings" set in SU Chocolate Chip ink and...
Photobucket

Thanks for stopping by.  Now your turn.  Go to Exploring Cricut and enter your project for the challenge!!  Until next time...

Sunday, November 20, 2011

Sassy Starter Sunday Project

  Photobucket
Hey Y'all. Today's card is super simple.  Life has been a little challenging lately so I haven't had a lot of time to craft.
Photobucket
Here are the layers of the bells from the Cricut Creative Memories cartridge,"Tis the Season" at 3.75" on my Gypsy.
Photobucket
I used Recollections brand papers from "Holiday Traditons" and Metallics and the Bravo Burgundy is from Stampin' Up!
Photobucket
The card base is a 5.5" x 8.5" piece of Bravo Burgundy folded in half.  A 4" x 5.25" piece of patterned paper from "Holiday Traditions" for the layer and Bravo Burgundy ribbon. Popped up the bells using Stampin' dimensionals on the card, stamped "JOY" using Bravo Burgundy ink and a sentiment from My Creative Time stamp set and...
Photobucket
Done!  Hope you like it.  You could make several of these in a small amount of time to give out for Christmas.  Thanks for looking, would love to hear your comments, and until next time...

Saturday, November 19, 2011

Me and Mickey's Blog Hop

Hello and welcome to Me and Mickey's Birthday Blog Hop!  If you came here from Tamara's blog, then your on the right track.  If you want to start at the beginning, go to Michele's Blog.  
I want to apologize for not doing a more interesting project, but time ran away from me.  

Photobucket


Recipe:  6" x 12" piece of Coral cardstock
              5 3/4" x 5 3/4" piece of patterned paper
              3" x 5 3/4" piece of lime cardstock (used happy birthday 
                                embossing folder on this piece)
              Minnie cut at 5 1/2" using Mickey and Friends using black, 
              white, blush, rose and patterned paper.
              Minnie popped up using Stampin' dimensionals
              Happy Birthday sentiment using My Creative Time set
              SU scallop circle punch and circle punch
Happy Birthday, Rexann!  And thanks for stopping by.  Your next stop is Rosewise's Blog.
Until next time....


Wednesday, November 9, 2011

Exploring Cricut Daily Design 3

Photobucket


Happy Hump Day, Ya'll!  Don't worry, you're not experiencing deja vu.  My card was made using the same patterned paper and cardstock as my Challenge project from Monday.

Photobucket


I started with a piece of Stampin' Up! Early Espresso cardstock cut  at 5 1/2 inches x 8 1/2 inches folded in half.  I then cut a piece of SU Old Olive cardstock at 4 inches x 5 1/4 inches and added a piece of pattened paper cut at 3 3/4 inches x 4 5/8 inches using my ATG.  I added a piece of ribbon I had gotten at Hobby Lobby last year.


Photobucket


I just got the Cricut Sophisticated for my birthday and wanted to use it, so I chose the 3rd image on the cart and cut it at 4.14 inches.  I always use my Gypsy when cutting with my cricut.


Photobucket


I used SU Early Espresso, Cajun Craze and More Mustard cardstock.  Here you can see all the pieces on my mat, ready to be cut.


Photobucket


The different layers are ready to be put together.  I adhered the patterned layer to the brown base using my ATG, then added the image with SU dimensionals.  I then used my SU Early Espresso ink with a sentiment from Pink by Design's "Bountiful Blessings" stamp set.  And voila!  


Photobucket


Such a quick and simple card.  Hope you like it.  Now it's your turn to make a quick and simple card!  Until next time...

Monday, November 7, 2011

Exploring Cricut Leaves and Acorns Challenge

Photobucket


This is my project for the Challenge this week at Exploring Cricut Challenge Blog.  Another Recipe Layout (without a printed recipe), LOL.


Photobucket


I started with an 8 x 8 piece of Stampin' Up! Early Espresso cardstock and used a 7 1/2 x 7 1/2 inch piece of printed paper from Stampin' Up! 
Autumn Traditions Designer Series paper placed on top to make a framed base.


Photobucket


Then I cut out my leaves and acorns using Cricut CTMH Art Philosophy cartridge that coordinates with the CTMH Harvest Happiness stamp set.and used the suggested sizes for each cut.
The Title was cut at 1.25 inches using the font on the same cartridge.  For the teapot and cups, I used Cricut Pagoda cartridge.
I used Stampin' Up! Early Espresso, Cajun Craze, More Mustard, and Wild Wasabi cardstock for my cuts. (Old Olive would have coordinated better.)


Photobucket


And here is another page for my recipe book.  I'd love to get it completed with 3 copies in all.  2 for my two oldest girls, and one to keep.
Hope you like how I used the leaves and acorns in this project.  Thanks for stopping by and Until next time...

Monday, October 31, 2011

Treat Bag Tags - She's A Sassy Lady Design Post


Photobucket

HAPPY HALLOWEEN!!! Today I want to share one last Halloween project that my Darling 5 y/o daughter and I were able to do together.  It's super, super simple, but a lot of fun to be able to spend some "crafty" time with your little one.


Photobucket


I used the ghost from Cricut Smiley Cards and omitted the pink circles for the cheeks.  The ghosts were cut @ 3.25 inches using Stampin' Up! Pumpkin Pie, Basic black and Whisper White cardstock.  Anna Claire used repositionable adhesive on the ghost layers.  I assembled as she applied adhesive.  Then, using Stampin' Up! Regal Rose ink, Anna Claire dabbed the ghost faces to make nice pink cheeks.


Photobucket


Next, using a stamp from "Small Talk" a My Creative Time Stamp set, Anna Claire stamped 'From' on the ghost backs and signed her name.


Photobucket


I used a standard hole punch to punch holes in the top of each ghost and attached hemp twine to the ghosts and tied a ghost around each goodie bag for Anna Claire's kindergarten classmates.  She's all set to share her "heart made" goodies with her friends.


Photobucket


I hope you enjoyed my project for today as much as I had spending "crafty" time with my daughter.  Now you make something with your little crafter!  Until next time...


Crafty hugs,
Leah

Wednesday, October 26, 2011

Exploring Cricut Daily Design 2

Photobucket


Happy Hump Day my crafty Peeps!  Today's project is so super simple!  I decided that since it was the last week before Halloween, I wanted to get everyone at work in the spirit.  I cut the 1st monster box on the Cricut Mini Monsters cartridge @ 4.60 inches. (You can fit two on one 12 x 12 sheet of cardstock.)   I used Scor-tape to adhere the sides of the box together and used some Halloween ribbon from Hobby Lobby to make the handles.  I glued the face pieces on using a Zig 2 way glue pen, and secured the arms with scotch tape inside the box.


Photobucket


Next, I filled the boxed with a small pkg. of Planters Mixed nuts, a pkg. of flavor filled crackers, and assorted chocolate candy.  I also threw in a cute Halloween pencil.  I downloaded six copies of one of the popular "Boo'd" poems and modified it a bit (switched the word desk for the "front door" part of the poem.)  The fun part was sneaking around the hospital, trying not to be noticed, and "Booing" my coworkers! I can't wait to see who joins in on the fun tomorrow!!!


Photobucket


Now it's your turn!  Hope you enjoyed my fun and super easy project!  Until next time.....

Monday, October 24, 2011

Exploring Cricut Celebrations Candy Challenge

Photobucket


Welcome to the 2nd Challenge of the Exploring Cricut Challenge Blog.  Today's challenge was to make a project using the candy pieces found on page 111 of the Cricut Celebrations cartridge.  I started by cutting the candy pieces at 4.5 inches out of SU Garden Green, SU Cherry Cobbler, and SU Whisper White cardstock.  I put the layers of candy together using Zip dry glue pens.


Photobucket


Here, I cut a piece of SU Cherry Cobbler cardstock to 8 x 8 and a piece of SU Jolly Holidays Designer Series paper at 7 3/4 x 7 3/4.
Adhered the sheets together using my ATG gun.


Photobucket


I cut the words "Peppermint Bark" out of SU Garden Geen and SU Cherry Cobbler using the Cricut Winter Wonderland cartridge font at 1.5 inches.  I also cut out the scallop shape out of SU Cherry Cobbler using the CTMH Art Philosophy cartridge on page 47.  My printer is out of ink so I will have to add my recipe for Peppermint Bark, later, but you get the idea.  I placed my candy cut outs on the page using SU Stampin' dimensionals and Pop Dots.  Added stickles to the candy to give it a little sparkle, and used a crystal embellishment to dot the "i" in Peppermint.  It's a nice sized 8 x 8 recipe layout.  If you'd like a recipe for Peppermint Bark, click HERE!


Photobucket


I hope you like my challenge project and are inspired to make a challenge project of your own.  Don't forget to come back Wednesday to see my Exploring Cricut "Daily Design."  Until next time.....

Saturday, October 22, 2011

Halloween Card

Photobucket

Made this card using silver vellum, SU Old Olive and Elegant Eggplant cardstock.  Orange and white scraps for label.  Used CTMH "Wicked" stamp set for sentiment.  Spider and web are cuts from Chic and Scary Cricut cartridge. Label is from CTMH Art Philosophy cartridge.  Red and copper stickles for eyes and detail on spider.  Spider web ribbon from Hobby Lobby.  ATG gun, Zig 2-way glue pen and SU dimensionals for adhesives.
Thanks for looking.  Until next time...

Blog Candy Winner!

Thanks to everyone for all the sweet birthday wishes!  Now, on to the important stuff!  The winner of my Blog candy is.........      Kim M!

 Kim M. said...


I hope you have a wonderful birthday! Thanks for the chance to win!

I will get your info and send it to you as soon as I can!
Until next time.......

Monday, October 17, 2011

Birthday Candy

So, my birthday is in a couple of days and I've decided to have a small giveaway.  All you need to do to qualify is 1) become a follower of my blog (if you aren't already) and 2) leave a comment on this post.  Easy, Peasy... lemon squeezie!                    *continental U.S. only, outside of 48 states welcome if you assist w/shipping* 
Photobucket
This stamp set is from Stampin' Up! and is called, "Yummy."  It's not available anymore unless you get it on ebay or someone who already has it. 
Since it's the time of of year of giving goodies and treats from the heart, I thought someone might find good use for this set.
I will choose a winner Saturday.  Until next time..........


Blog made pretty using Designs by Sarah's Blog Makeover Service. Graphics © Echo Park Paper Co.