Videos Contact Projects Subscribe Home


Monday, October 31, 2011

Treat Bag Tags - She's A Sassy Lady Design Post


Photobucket

HAPPY HALLOWEEN!!! Today I want to share one last Halloween project that my Darling 5 y/o daughter and I were able to do together.  It's super, super simple, but a lot of fun to be able to spend some "crafty" time with your little one.


Photobucket


I used the ghost from Cricut Smiley Cards and omitted the pink circles for the cheeks.  The ghosts were cut @ 3.25 inches using Stampin' Up! Pumpkin Pie, Basic black and Whisper White cardstock.  Anna Claire used repositionable adhesive on the ghost layers.  I assembled as she applied adhesive.  Then, using Stampin' Up! Regal Rose ink, Anna Claire dabbed the ghost faces to make nice pink cheeks.


Photobucket


Next, using a stamp from "Small Talk" a My Creative Time Stamp set, Anna Claire stamped 'From' on the ghost backs and signed her name.


Photobucket


I used a standard hole punch to punch holes in the top of each ghost and attached hemp twine to the ghosts and tied a ghost around each goodie bag for Anna Claire's kindergarten classmates.  She's all set to share her "heart made" goodies with her friends.


Photobucket


I hope you enjoyed my project for today as much as I had spending "crafty" time with my daughter.  Now you make something with your little crafter!  Until next time...


Crafty hugs,
Leah

Wednesday, October 26, 2011

Exploring Cricut Daily Design 2

Photobucket


Happy Hump Day my crafty Peeps!  Today's project is so super simple!  I decided that since it was the last week before Halloween, I wanted to get everyone at work in the spirit.  I cut the 1st monster box on the Cricut Mini Monsters cartridge @ 4.60 inches. (You can fit two on one 12 x 12 sheet of cardstock.)   I used Scor-tape to adhere the sides of the box together and used some Halloween ribbon from Hobby Lobby to make the handles.  I glued the face pieces on using a Zig 2 way glue pen, and secured the arms with scotch tape inside the box.


Photobucket


Next, I filled the boxed with a small pkg. of Planters Mixed nuts, a pkg. of flavor filled crackers, and assorted chocolate candy.  I also threw in a cute Halloween pencil.  I downloaded six copies of one of the popular "Boo'd" poems and modified it a bit (switched the word desk for the "front door" part of the poem.)  The fun part was sneaking around the hospital, trying not to be noticed, and "Booing" my coworkers! I can't wait to see who joins in on the fun tomorrow!!!


Photobucket


Now it's your turn!  Hope you enjoyed my fun and super easy project!  Until next time.....

Monday, October 24, 2011

Exploring Cricut Celebrations Candy Challenge

Photobucket


Welcome to the 2nd Challenge of the Exploring Cricut Challenge Blog.  Today's challenge was to make a project using the candy pieces found on page 111 of the Cricut Celebrations cartridge.  I started by cutting the candy pieces at 4.5 inches out of SU Garden Green, SU Cherry Cobbler, and SU Whisper White cardstock.  I put the layers of candy together using Zip dry glue pens.


Photobucket


Here, I cut a piece of SU Cherry Cobbler cardstock to 8 x 8 and a piece of SU Jolly Holidays Designer Series paper at 7 3/4 x 7 3/4.
Adhered the sheets together using my ATG gun.


Photobucket


I cut the words "Peppermint Bark" out of SU Garden Geen and SU Cherry Cobbler using the Cricut Winter Wonderland cartridge font at 1.5 inches.  I also cut out the scallop shape out of SU Cherry Cobbler using the CTMH Art Philosophy cartridge on page 47.  My printer is out of ink so I will have to add my recipe for Peppermint Bark, later, but you get the idea.  I placed my candy cut outs on the page using SU Stampin' dimensionals and Pop Dots.  Added stickles to the candy to give it a little sparkle, and used a crystal embellishment to dot the "i" in Peppermint.  It's a nice sized 8 x 8 recipe layout.  If you'd like a recipe for Peppermint Bark, click HERE!


Photobucket


I hope you like my challenge project and are inspired to make a challenge project of your own.  Don't forget to come back Wednesday to see my Exploring Cricut "Daily Design."  Until next time.....

Saturday, October 22, 2011

Halloween Card

Photobucket

Made this card using silver vellum, SU Old Olive and Elegant Eggplant cardstock.  Orange and white scraps for label.  Used CTMH "Wicked" stamp set for sentiment.  Spider and web are cuts from Chic and Scary Cricut cartridge. Label is from CTMH Art Philosophy cartridge.  Red and copper stickles for eyes and detail on spider.  Spider web ribbon from Hobby Lobby.  ATG gun, Zig 2-way glue pen and SU dimensionals for adhesives.
Thanks for looking.  Until next time...

Blog Candy Winner!

Thanks to everyone for all the sweet birthday wishes!  Now, on to the important stuff!  The winner of my Blog candy is.........      Kim M!

 Kim M. said...


I hope you have a wonderful birthday! Thanks for the chance to win!

I will get your info and send it to you as soon as I can!
Until next time.......

Monday, October 17, 2011

Birthday Candy

So, my birthday is in a couple of days and I've decided to have a small giveaway.  All you need to do to qualify is 1) become a follower of my blog (if you aren't already) and 2) leave a comment on this post.  Easy, Peasy... lemon squeezie!                    *continental U.S. only, outside of 48 states welcome if you assist w/shipping* 
Photobucket
This stamp set is from Stampin' Up! and is called, "Yummy."  It's not available anymore unless you get it on ebay or someone who already has it. 
Since it's the time of of year of giving goodies and treats from the heart, I thought someone might find good use for this set.
I will choose a winner Saturday.  Until next time..........

New Bloggers Hop Winner!

The winner of the "So What's New Blog Hop" is......... Karen!

Photobucket


 Karen said...


Wow, lots of comments! I'd say this day was a success. Love your card made with love!


Karen! Email me with your information so I can get this beauty out to you!
Thanks to everyone who visited and gave a group of new bloggers lots of support and encouragement!  Truly appreciated!
Until next time......

Sunday, October 16, 2011

Another BCA card - Love you, Janet!!!

Photobucket


Here's another card I made for Breast Cancer Awareness.  
It's a simple A2 card.  I used bikini cut from "Life's A Beach" cricut cartridge cut at 3.25 inches. Marieska (my Gypsy) helped.  I was able to delete the cuts I didn't need.  The ribbon is from Pink Journey cartridge cut at 1.25 inches.  SU border punch used on BB cardstock. Added a few bling dots and a sentiment from Pink Cricut's "Breast Wishes" stamp set.


Thanks for looking and until next time......

Wednesday, October 12, 2011

My Exploring Cricut - Daily Design

Photobucket


Happy Hump Day, my crafty Peeps!  Rosette themed wreaths seem to be all the rage these days.... I won't be left out! LOL! Seriously, I think they are adorable and I had to try one for myself. 


Photobucket


I started off with the gorgeous DCWV Harvest Gatherings Stack.


Photobucket


 I used several different patterned papers from this stack to make my different sized rosettes.  There are several tutorials out there on how to make rosettes, but you can find one here from YOUTUBE.


Photobucket


I made my wreath base by taking the largest rosettes and hot gluing them together to make a "cirle." (Well, circle-ish)  Then I added the smaller ones here and there to fill it in.


Photobucket


I also added these loose fall leaves that I found at Michaels.  Just hot glued them here and there to give it some character.


Photobucket


Photobucket


Photobucket


I used my Gypsy(Mareiska) to cut out this cute scarecrow from the Cricut Lite Celebrate with Flourish cartridge @ 5.5 inches.


Photobucket


Photobucket


I used Mareiska to cut this pumpkin bundle from the Disney Pooh and Friends cartridge @ 3.5 inches.


Photobucket


Photobucket


Mareiska helped me with this Welcome sign, too.  She had to work a little harder though.  I used the Home Accents cartridge for the sign.  I started with the sign @ 10 inches wide.  I unhighlighted the little chain between the length and width and shrunk the height so that the Welcome would fit on a 2 inch piece of paper with a thin border visible.  Then cut the word Welcome using the Cricut Lite Lovely Floral cartridge.  (When it comes to using my Cricut, Mareiska is my BFF--I don't use Cricut w/o her)


Photobucket


Photobucket


Here are close up pics of the pumpkins and scarecrow--he's cute!!


Photobucket


Photobucket


And the finished project.  I added some button embellishments here and there to the rosettes, for "pizzazz." (whatever that word means, I just like how it sounds...pizzazz!)  LOL!
Well, I hope you liked my project for today and if you haven't made one , try it out for yourself!  Until next time.....

Monday, October 10, 2011

Art Philosophy Challenge

Photobucket


Hey! Today I am posting my first challenge as a Design Team member of the new "Exploring Cricut" Challenge Blog!  Our challenge was to use the square 3 on page 43 of the Cricut Art Philosophy Cartridge and at least 2 of any of the flowers from the cartridge.  Since I don't own Art Philosophy (boo-hiss!), Diane had to cut the pieces for me and send them in the mail.  Luckily, I got them on Friday!  For my flower cuts, I chose the 2 using the font button on page 69 and the first one using the font button on page 70.  Thanks, Diane!


I made this treat jar and card to give as a gift!  If you like Payday candy bars, you need to try this out!


Photobucket


Here is the "treat."  Mix equal parts dry roasted salted peanuts and candy corn.  I put them in this airtight container I picked up at Michaels.  Can't give someone a plain container...time to decorate.


Photobucket


These are the cuts Diane sent me in the sizes I asked for.  (Note to self, NEVER cut these flowers this small. LOL)


Photobucket


Well, I did manage to get the flowers put together, along with my fingers, using a zip dry glue pen.


Photobucket


I cut Stampin' Up! Basic Black and Old Olive cardstock and K&Co. Halloween patterned paper to wrap around the jar. 


Photobucket


I used the Martha Stewart Drippy Goo punch to make the olive cardstock look like slime.  Of course I used my trusty red ATG gun w/the Acid Free tape to adhere the cardstock to the jar.  Yes I have 2.  A pink one that has the regular tape and a red one that has my acid free tape.


Photobucket


Wow, I need to clean my ScorPal.  Used it to score the cardstock to make a rosette for the top of the jar using K&Co. patterned paper and Old Olive cardstock.


Photobucket


 I had some Halloween decorative pieces and I found a piece of candy corn that I added to my rosette.


Photobucket


Photobucket


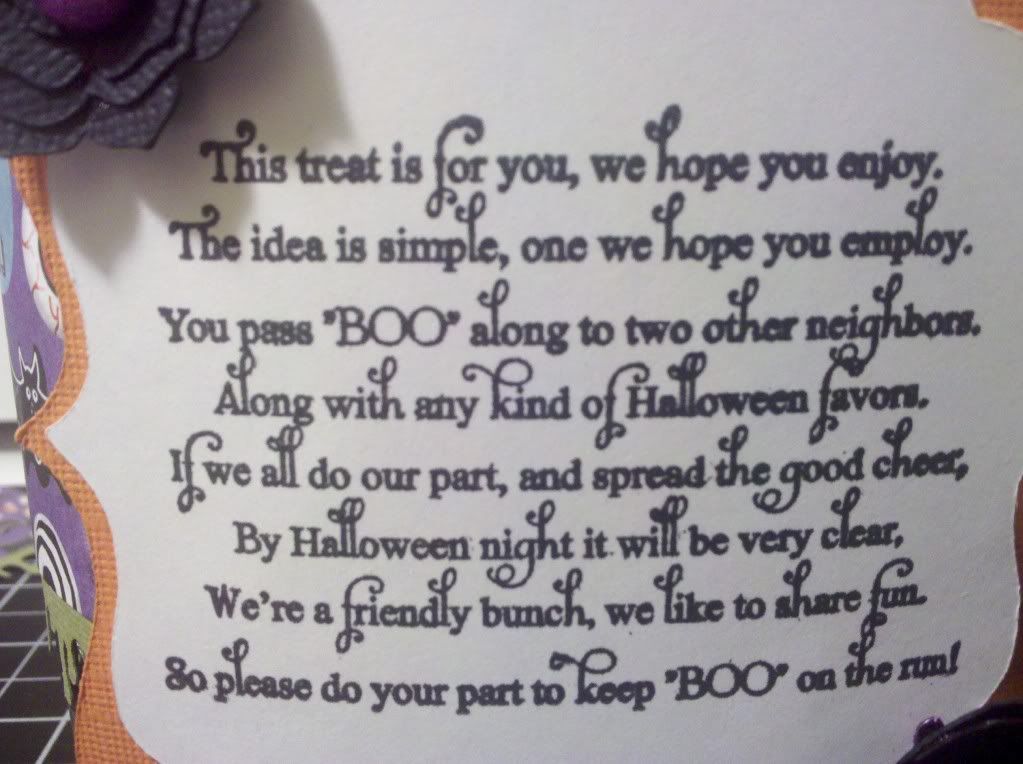
I cut a square as close to the same pattern as the Art Philosophy cartridge from SU Whisper White cardstock using the Cricut Lite Lacy Labels cartridge. I stamped the poem on the White square using a stamp from PaperTrey ink from the Been Boo'd set. I also stamped the ghost and BOO from the same PaperTrey Ink set on SU Whisper White paper and backed it with some SU purple cardstock (that I don't remember the name of)


Photobucket


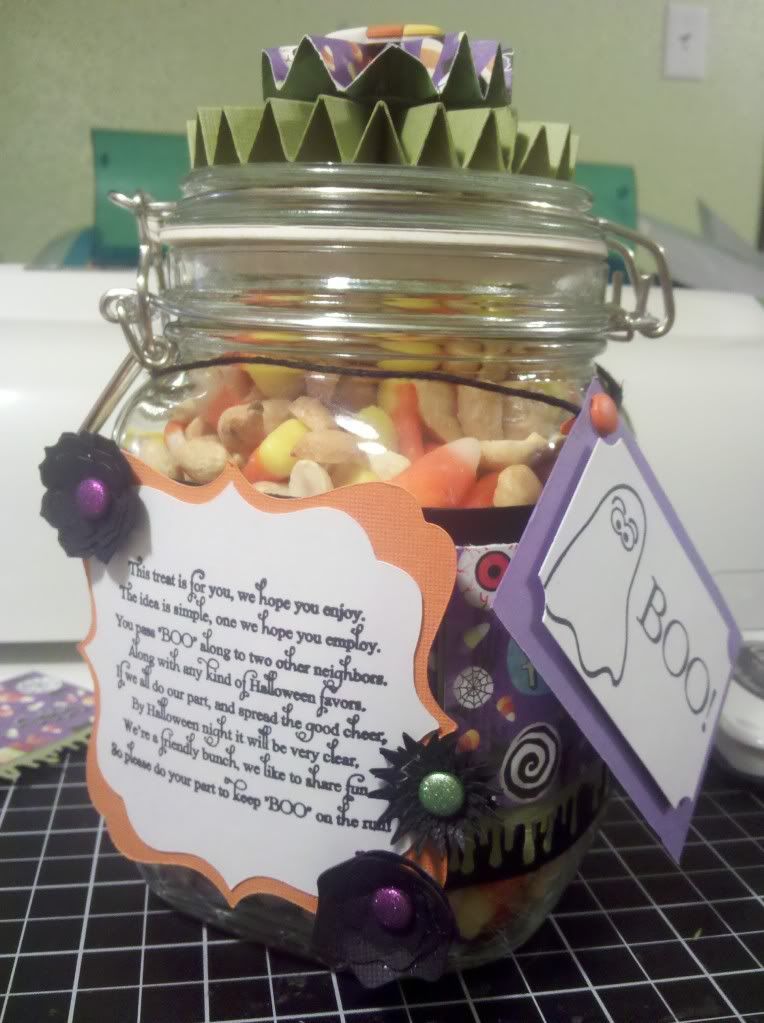
Next, I punched a hole in center of all the flowers and added some "Recollections" brads to the center of the flowers.  I added the flowers to the square using glue dots.


Photobucket


I made a coordinating card to match.  I inked the edges of the white square using SU Kiwi Kiss ink.  The sentiment in the center is from My Pink Stamper stamp set. More of those pesky flowers. (Don't ya love the brads in the middle?!)


Photobucket


Yep, the sentiment inside is a stamp from the same PaperTrey Ink stamp set. Sorry so fuzzy.


Photobucket


Here they are together, again.  Just waiting for me to secretly give away to a friend!                                Now it's your turn to grab your Art Philosophy cartridge and use square 3, any two flowers and come up with a fun project! (And if you have an extra one lying around, my birthday is later this month, LOL!)  Hope you enjoyed my project today.  Be sure to visit the other designers from the "Exploring Cricut" Challenge blog for more inspiration.  Oh, and don't forget to come back Wednesday to see my "Exploring Cricut" Daily project. Until next time.....

Sunday, October 9, 2011

DAY 2 of the "SO WHAT'S NEW?" BLOG HOP

Photobucket


If you came here from Susan's blog, then your on the right track!  If not, then start with Roberta so you don't miss out on all the talented bloggers' projects!


For my project, I made 2 cutie patootie post-it note holders in Halloween fashion!
Photobucket


Photobucket


Photobucket


Post is pic heavy, Sorry, just want you to see how super cute they are.  And super easy to make!!!


Photobucket


I found the instructions @ Splitcoaststampers


Photobucket


Photobucket


Ok.  That's all for pictures.  Now for the Supply List:


Stampin' Up! Cardstock and Ink. Super Cute post its I found in the $1 bins @ Target! Patterned paper (also found in the $1 bins) and Patterned paper from K& Co.
ATG gun, Stampin' dimensionals, Stampin' Up! ribbon, Peachy Keen stamps for spider, My Creative Time stamps, googly eyes, My Pink Stamper stamps, Happy Hauntings Cricut cartridge and Mini Monsters Cricut Cartridge, stickles (for a little, bling-bling) and Action Wobbles!! I wish you could see the little Spider shake his stuff!  The cauldron wiggles too, but not as cute as Spidey.


Well, that wraps up our "So What's New?" Blog Hop.  I'd like to thank everyone who visited and showed support to a group of new bloggers!  Your comments and advice is truly appreciated.  We hope you liked what you saw and will visit again.


Don't forget to visit all the blogs from Day1 and Day2, become a follower and leave a comment of each blog on both days to be eligible for the green and black Cricut Cartridge Binder.


Photobucket


You have until October 16th 11:59 pm to enter to win.
I will announce the winner October 17th.  Several of the other bloggers are also offering Candy.  Be sure to check them out and fulfill the requirements of their criteria to be eligible for their candy!


Again, thanks for your support and allowing us to show off our newly created blogs!!


Blog made pretty using Designs by Sarah's Blog Makeover Service. Graphics © Echo Park Paper Co.